Purple Chicken Mystery Solved: A Home Cook’s Guide to Safe Poultry Handling
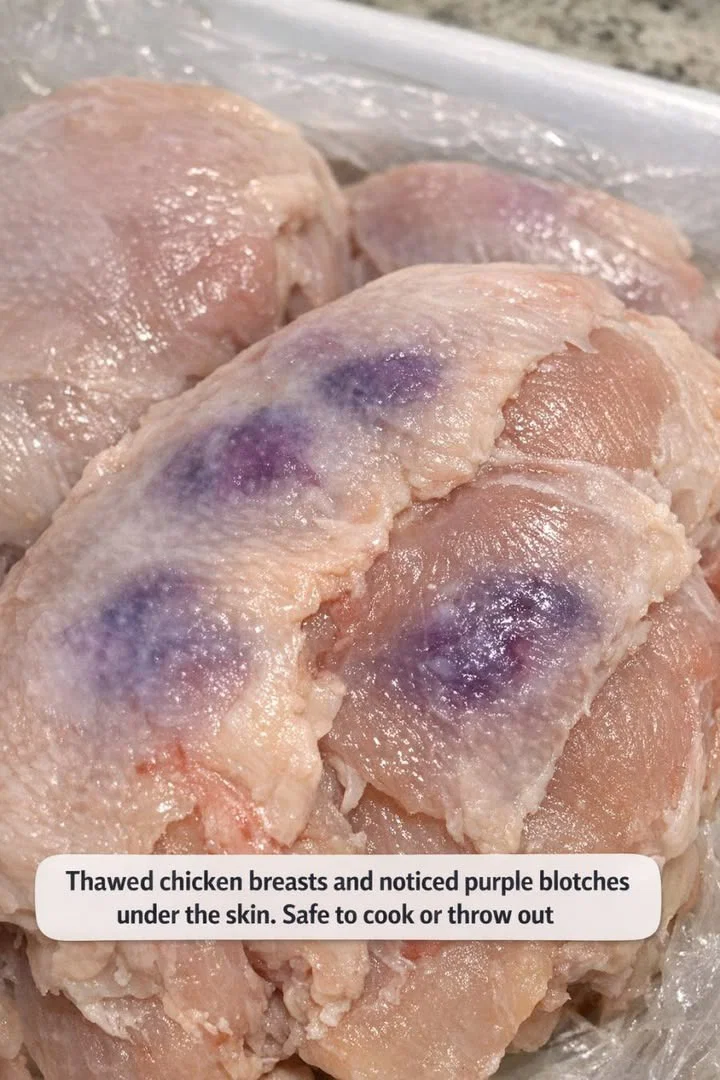
You’re standing at your kitchen counter, ready to prepare dinner, when you peel back the plastic on your thawed chicken breasts and freeze. There, beneath the skin, are distinct purple or dark red blotches. Your heart sinks. Is this a sign of spoilage? A health hazard? Should you risk it or toss $15 worth of protein straight into the trash? That moment of culinary uncertainty is more common than you think—and the answer isn’t always what you’d expect.
Understanding poultry safety is critical, especially with chicken being a leading carrier of foodborne pathogens like Salmonella and Campylobacter. But not every abnormality signals danger. This definitive guide will unpack the science behind those mysterious discolorations, giving you the confidence to make the right call every time.
Decoding the Purple Blotches: The Top 3 Culprits
1. Post-Mortem Bruising (The Most Likely Cause)
This is the #1 reason for purple marks. During the automated harvesting and processing, birds can experience physical impacts—being bumped, pressed, or handled—that cause minor internal bleeding (hematomas) under the skin and in the muscle tissue. This is especially common in larger breast meat.
What it looks like: Localized, maroon-to-purple patches or streaks, often along one edge or in a specific spot.
Is it safe? YES. This is simply a cosmetic issue. The blood has coagulated and the tissue is otherwise normal. It is 100% safe to cook and eat once cooked to the proper temperature.

2. Freezer Burn & Oxygen Deprivation (The “Purple Skin” Phenomenon)
This is specifically tied to the freezing and thawing process. Chicken skin contains a pigment called hemoglobin. When chicken is frozen, ice crystals form. If packaged in an airtight, vacuum-sealed environment (common in store-bought frozen breasts), the lack of oxygen can cause hemoglobin to darken to a purplish-brown hue, particularly under the skin and around bones. Upon thawing, this becomes vividly apparent.
What it looks like: A more generalized purple or dark tinge under the skin, not necessarily blotchy. The meat itself might appear slightly darker in areas.
Is it safe? YES, with a caveat. The color change itself is a chemical reaction, not spoilage. However, assess for other signs: If the purple areas are accompanied by a sticky texture, a sour or off-odor, or excessive liquid, it may indicate the chicken was frozen after beginning to spoil.
3. Melanosis (Rare, but Natural)
In very rare cases, dark spots can be melanosis—an accumulation of natural pigment cells, similar to a freckle or mole in humans. It’s a benign, non-microbial condition.
What it looks like: Small, concentrated dark spots, sometimes almost black.
Is it safe? YES. It is a natural occurrence and poses no health risk.
The Red Flags: When to Throw It Out Immediately
Color alone is not a reliable indicator of spoilage. You must conduct a full sensory assessment. If you see purple blotches AND encounter any of the following, discard the chicken immediately:
The Smell Test: A definitive, sour, sulfuric, or ammonia-like odor. Fresh chicken has a mild, almost neutral smell. Your nose is your best tool.
The Touch Test: A thick, sticky, or slimy film on the surface, even after rinsing.
The Visual Test: Greyish overall color (not purple spots), significant green tinges, or visible mold.
The Thaw Test: If the chicken was thawed in the refrigerator for more than 2 days, or at room temperature for over 2 hours.
The Safe Handling Protocol: If You Decide to Cook
If your chicken has purple blotches but passes the smell/touch/sight tests, follow this protocol for absolute safety:
Don’t Rinse: Rinsing can spray bacteria across your sink. Pat the chicken dry with paper towels.
Cook to Temperature, Not Color: Use a calibrated digital meat thermometer. Insert it into the thickest part of the breast.
The USDA safe internal temperature is 165°F (74°C). Hold at this temperature for at least 30 seconds.
Pro-Tip for Juiciness: For optimal texture, cook to 160°F (71°C) and let rest for 5 minutes. The carryover heat will bring it to 165°F while keeping it juicier.
Cut and Check: After cooking, cut into the thickest part. All signs of purple/red should be gone, and juices should run clear. If any pink remains or the texture is gelatinous, return it to the heat.
Prevention & Best Practices: Avoiding the Mystery Next Time
Buy Smart: At the store, check the package date and avoid any with torn seals or excessive liquid (purge), which can indicate refreezing.
Freeze Properly at Home: Portion chicken, wrap tightly in plastic wrap or freezer paper, then place in an airtight freezer bag, removing as much air as possible. Label with the date. Use within 9 months for best quality.
Thaw Safely: Always thaw in the refrigerator (allows 24 hours for breasts), in a cold water bath (change water every 30 mins), or in the microwave using the defrost setting only if cooking immediately.
The 2-Hour Rule: Never let raw chicken sit in the “Danger Zone” (40°F – 140°F) for more than 2 hours (1 hour if ambient temperature is above 90°F).
The Final Verdict
In the vast majority of cases, purple blotches on thawed chicken are harmless bruising or a freezer artifact. They are safe to cook, provided the chicken has no foul odor, slimy texture, or other signs of spoilage.
Trust your senses more than the color. When in doubt, remember the adage: “If in doubt, throw it out.” No meal is worth a serious foodborne illness. But armed with this knowledge, you can confidently assess your poultry, reduce food waste, and cook safely for yourself and your family.
Now you know. Next time you see that purple mark, you won’t feel panic—you’ll feel like an informed kitchen scientist, ready to make the right call.